P&ID Symbols 1 - Symbol Diagram Basics
How to read a P&ID?
1. P&ID vs PFD
Interpreting technical diagrams is often a challenge for young engineers. Identifying and understanding the different symbols that appear on a diagram as well as the connection between the different elements may seem trivial at first but sometimes requires additional knowledge.
This article is a brief introduction to the question of how to read a P&ID and what information is contained on a P&ID. This article will review general concepts and basic rules to offer in the last section a final list of the different identifications and symbologies necessary to make a good interpretation of a diagram.

The P&ID starts from the PFD and includes the control loops. If we compare both kinds of documents, PFD and P&ID, the P&ID Diagram has more details about the plant topology and displays equipment (including spare units), pipelines (with details about scheduling and isolation), instrumentation and valves, and signal-related.
So, the P&ID Diagram lets you visualize in just one time the process flow and all the related control functions and monitoring functions.
Other related articles:
-
If you are interested to know more about subjects like Purpose, Owner and Contents & Conventions, read our free introduction to these concepts in our article P&ID Diagram Basics Part 1 Purpose, Owner and Contents.
-
If you are interested to know more about subjects like Standards and Guidelines, read our free introduction to these concepts in our article P&ID Diagram Basics Part 2 International Standards.
-
If you are interested to know more about subjects like Functional Identification and Instrument Numbering, read our free introduction to these concepts in our article P&ID Diagram Basics - Part 3 - Functional Identification and Naming Conventions.
2. What information is contained on a P&ID?
The information usually displayed in P&ID diagrams is:
- Plant equipment, normally we will find all types of process pumps, compressors, and any other type of rotating element, such as centrifuges or air coolers. It is possible that in the tanks or vessels we can find the different design levels (maximum, normal, and minimum).
- It is a good practice to represent the relative size, shape, and location of the actual equipment in the plant. Pitting, nozzles, and access routes should normally be defined in this type of diagram.
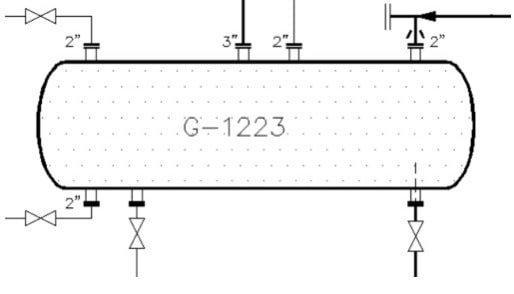
- Regarding the instrumentation, we will find in this type of diagram all the information related to the connection of the instrument with the control system, either through a current loop connection or through a data bus.
- In the P&ID diagrams we will find information on all the process pipes, control valves, and ON / OFF valves, any type of derivatives of the process flow, relief valves, safety valves, drains, and any other type of element or device in line such as, for example, check valves, filters, or reductions/extensions.

- Typically you will also find the design and set pressure of all the relief and safety valves, as well as the same information for the rupture discs, pressure, and temperature regulators. In the case of lines with a layout, we will normally find the type of layout if it is steam or electric, and if it also has an automatic control system, it will appear in the diagram.
- When it is necessary to indicate the existence of sloping lines, the slope will normally be displayed. A common case can be the arrangement of the pulse lines of an orifice plate with the corresponding pressure instrument.
- In the case of motors, its voltage and power can be displayed or displayed. Usually, the motors have a typical and standard connection diagram for the entire plant.
- The logic associated with starting and stopping the motor is usually included in P&ID diagrams.
- Elements related to control and instrumentation:
- All instruments are represented by standardized symbols that indicate the location of the equipment, whether it is in the plant or in the technical room, and the type of connection of the instrument with the associated control system.
- Depending on the type of connection and the equipment where it is connected, a different symbol will be used. The P&ID will use symbols and circles to represent each instrument and how they are interconnected in the process.
- For example, the same symbol is not used for an instrument that is connected to a distributed control system (DCS) or for an instrument connected to a Safety Instrumented System. In addition, we will also find represented the signal transmission method and the actions of the control valve in case of air/electrical failure, that is, failure to open (FO), failure to close (FC), or last lock failure position (FL).
More information can be found in our article P&ID Symbol Diagram Basics - Part 1 - Purpose, Owner & Contents.
3. P&ID Diagram Design
General Rules
The design of a P&ID diagram generally follows from left to right in the drawing.
Notes are usually added to the right side of a P&ID above the title block and are used to:
- Describe elements of the P&ID.
- Provide guidance in understanding the P&ID information.
- Make reference to other documents.
Any piece of equipment or instrument should be shown only once in a single P&ID diagram. If it is necessary to show it in more than 1 P&ID diagram, it is necessary to indicate or represent the equipment or instrument through dotted lines or clouds.
3.1 What is included in a P&ID Drawing?
- Shows the relative location of process equipment, sensors, and actuators in a process.
- Conceptual outline of a chemical plant.
- Provide a common language for discussing a plant.
- Show control connections between sensors and actuators.
3.2 What is not included in a P&ID Drawing?
- Not an architectural diagram of a process. Positions in a P&ID do not correspond to a 3D position, but more connectivity.
- Not to scale.
- Not a diagram of the reaction kinetics.
- Not a control diagram (block diagram), influence graph, incidence graph, Bayesian network, or correlation network.
Reactors, tanks, vessels, and equipment are not drawn to scale.
What do we mean? The elements present in the diagram are not to scale, which implies that it is possible to find that the location of some elements, for example, drains, is not in their exact position.
3.3 Direction of Flow
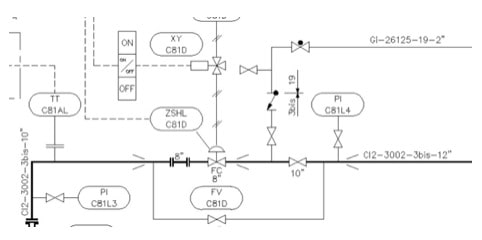
In general, the main direction of flow proceeds from left to right and from top to bottom. Inlet and outlet arrows are used for indicating the inlet and outlet of flows into or out of the diagram. Arrows are incorporated in the line for indicating the direction of the flows within the flow diagram. If necessary for proper understanding, arrows may be used at the inlets to equipment and machinery (except for pumps) and upstream of pipe branches.
Process lines entering and leaving the diagram from/to other drawings in the Unit shall be terminated at the left-hand or right-hand side of the drawing.
3.4 Crossing Lines
To obtain a clear representation, different line widths shall be used. Main flow lines or main piping shall be highlighted.
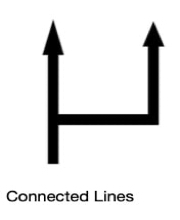
To indicate that two lines are connected we will use the diagram on the left, to indicate that there is no connection between the lines we will use the diagram on the right.

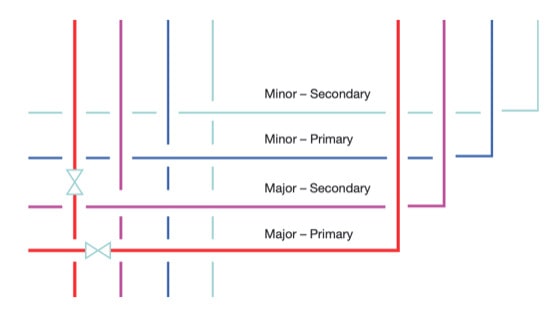
As shown in the figure below, the pipe and signal lines, also known as the major and minor lines, should be broken according to the hierarchy in the order of major-minor and primary-secondary lines, when they cross.
3.5 Instrument Locations
Instrumentation symbols reflect process instruments, for example, transmitters, gauges, valves, analyzers, or controllers.
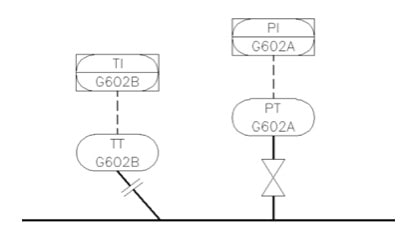
These symbols and their corresponding labels identify the instrument's functions and their locations. To learn more about the different instrument naming systems you can read our article:
P&ID Symbol Diagram Basics - Part 3 - Functional Identification and Naming Conventions.
The following figure from the ISA standard document lists common instrumentation symbols.
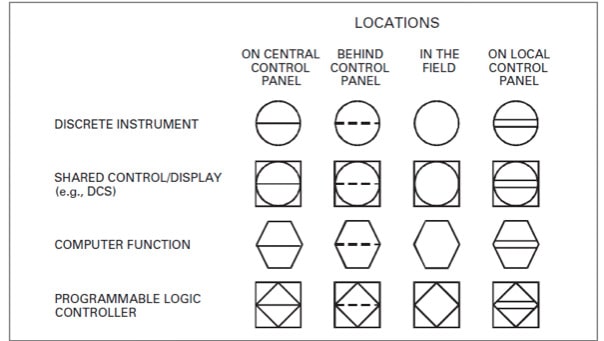
As shown in the previous figure, we can find 4 types of graphical shapes, such as circles, squares, hexagons, and diamonds, possess specific denotation.
- A circle indicates a device is located in the field area of a plant.
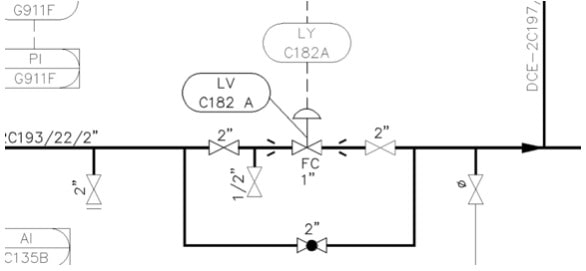
- A circle with an external square represents devices or functions which belong to a shared display and control system, for example a DCS system.
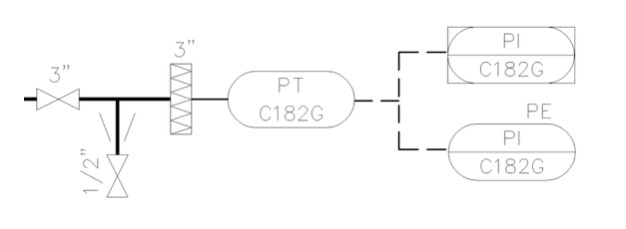
- A hexagon represents a computer function.
- A diamond with an external square defines functions within a programmable logic controller, for example an alarm configured in a SIS (Safety Instrumented System).
Regarding the lines inside the symbols:
- No horizontal line - located somewhere in the field, probably close to the general area shown on the P&ID.
- Single horizontal line - One line inside means the device is located in the central control room or some computer screen in the main control room.
- Two lines inside indicate the device is located in a local panel.
- Dotted line inside means the device is installed behind or inside of a panel and inaccessible to the operator (normally not in view).
4. Legend Sheets
Also called "Lead Sheets" or “Master Sheets”, this kind of documents are required to explain line identifications and describe all the symbols used on P&IDs. The detail shown on such a legend P&ID will vary with corporate culture, but typically includes these main sections:
- Line Identification
- Equipment Identification
- Instrument Identification
- Fluid Identification
- Other Legends
- Valve Positions
- Tracing & Insulation Codes
- Transducer Functions
- Line symbols
- Instrumentation symbols
- Valve symbols
- Vents & Drains symbols
- Equipment
- Piping & Connecting Shapes
- Tags & Labels