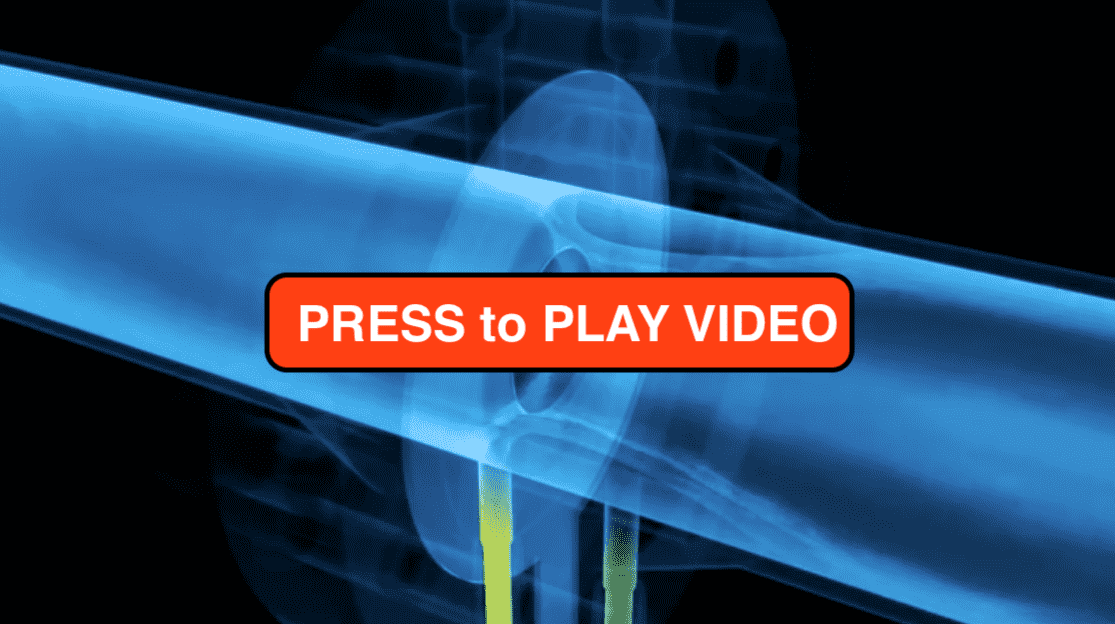
Orifice Plate Installation Guidelines
How to install an orifice plate?
An orifice plate is a flow-restriction device that is used to measure the flow rate of a fluid in a pipeline. It is typically installed in a pipe by cutting a hole in the pipe and welding or bolting the orifice plate in place. The orifice plate has a sharp edge or "throat" that creates a restriction in the flow of the fluid. The pressure drop across the orifice plate is proportional to the flow rate, so by measuring the pressure drop, it is possible to determine the flow rate of the fluid.
In this article you will find basic orifice plate installation guidelines, including:
- orifice plate tap orientation
- orifice plate tapping locations
- orifice tapping
- etc…
This post is mainly a set of rules for the orifice plate installation like an orifice flow meter installation guidelines. In order that a flow instrument may accurately read flow, it's necessary that the installation comply with certain rules.
Follow the recommendations regarding elimination of flow disturbances, and the general layout and piping data.
Download your free PDF file about how to install an orifice plate!
We have prepared this complete pdf so that you have all the information we give in this article and you can share it, discuss it with your colleagues and use it professionally.
We consider that it is better to have a well-formatted text that includes all the key concepts explained in this publication ready to share or save for later use.
- Rating: 4.6 - 636 reviews
You can share this article through:
1.Installing an Orifice Meter
There are a few key general considerations when installing an orifice plate:
- Determine the location where the orifice plate will be installed. The orifice plate should be installed in a straight section of pipe, with no fittings, elbows, or other obstructions within a certain distance of the plate. This distance is known as the "pipe run" and is typically at least five pipe diameters upstream and downstream of the plate.
- Clean the pipe thoroughly to remove any debris or contaminants that may interfere with the accuracy of the flow measurement.
- Install the orifice plate in the pipe using bolts, clamps, or a flange. The orifice plate should be installed such that it is perpendicular to the flow of the fluid and the sharp edge or throat is facing directly into the flow.
- The orifice plate should be installed at the appropriate elevation to ensure that the pressure taps are located at the correct heights.
- It is important to properly seal the orifice plate to prevent leaks. This can be done with gaskets or by using a pipe flange with bolts and nuts to secure the orifice plate in place.
- Install a differential pressure transmitter downstream of the orifice plate to measure the pressure drop across the plate. The pressure drop is used to calculate the flow rate through the orifice plate.
- Calibrate the orifice plate and differential pressure transmitter according to the manufacturer's instructions. This typically involves flowing a known volume of fluid through the orifice plate and measuring the resulting pressure drop.
The section of the pipe in which the primary element is installed can be horizontal, inclined or vertical.
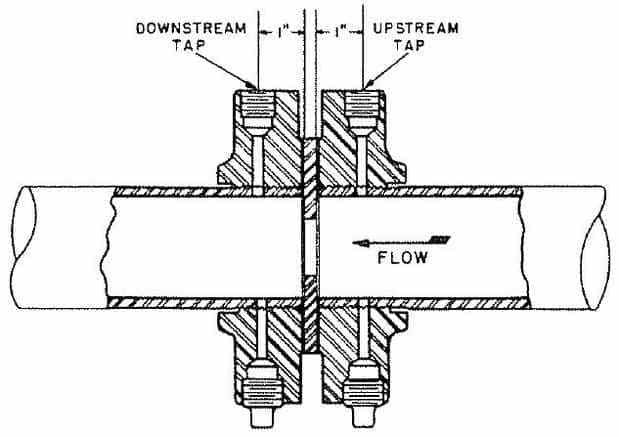
The direction of the flow is immaterial except when a foreign substance such as sediment or vapor is carried in suspension.

In this case it is preferable to install the primary element in vertical section of the line with the flow in such a direction that the foreign substance will readly carry on trough the primary element, i.e. upward in the case of vapor and downward in the case of sediment.
2.How does an Orifice Plate Work? What is an Orifice Plate?
3.Flow Disturbances and Recommendations
The Orifice Meter must be installed in the proper orientation relative to the pipe and the fluid measured.
Pipe fittings and valves upstream from the primary element generate swirls and crosscurrents, which if uncorrected by a straightening vane may considerably upset the flow measurement. For accurate measurement the use of straightening vanes is usually imperative; however, if we are mainly concerned in the comparison of relative values or in control, vanes may be unnecessary.
Also, if the only source of disturbance is a single bend, ell, tee, or reducer preceding the orifice plate run, straightening vanes effect no improvement.
General Installation requirements:
- The orifice meter must be installed between two mating flanges in the pipe.
- For liquid metering, the pipe should run full at the measuring section.
- The diameter of the tube must be circular over the measured length.
- The internal surface of the measuring pipe must be clean and free of scale, pitting and deposits or any other possible source of turbulence.
- The pipe and pipe flanges should be lagged for orifice plate steam applications.
The minimum recommended lengths for upstream and downstream for optimum accuracy are shown below. Shorter lengths can be used, although this will reduce the accuracy of the system.

Orifice Plate Installation Straight Run Requirement
To be able to have the required precision, it is necessary that our pipe has a previous straight run long enough to avoid disturbances in the fluid that will change in the flow profile that the orifice plate receives. It is possible to reduce the straight run length but it will surely affect the final accuracy of the orifice meter.
A. Straightening Vane IS NOT used
For the various types of upstream disturbances listed bellow, allow the recommended minimum distances of straight pipe between the disturbance and the upstream pressure tap.
- Flanges, collars, wide-open gates, reducers or bends, elbows or tees which are all in the same plane – 10 pipe diameters
- Angle turns in two planes – 50 pipe diameters
- Pressure regulator, control valve or similar apparatus or fitting – 75 pipe diameters
B. Straightening Vane IS used
If a straightening vane is employed, 10 pipe diameters of straight pipe preceding the upstream pressure tap and 5 following the downstream tap will be sufficient. The outlet face of the straightening vane should be located 6 or more pipe diameters upstream from the upstream pressure tap regardless of the type of pressure connections employed, but not closer than 4 pipe diameters to the nearest upstream disturbance.

C. Minimum Straight Run lengths for Orifice Runs and Other Flow Elements in Accordance with ISO 5167-2
To avoid disturbances in the flow lines and to be able to measure the pressure with the required precision similar to that made experimentally to obtain the coefficients applied in the calculation, all the elements that generate differential pressure require that the correct lengths are installed correctly before and after of the measuring element.
The necessary straight sections are based on the diameter ratio of the orifice plate (d) with respect to the inner diameter of the pipe (D). In this way, the lower the beta ratio, the lower the requirement for the length of straight sections. It is recommended, whenever possible, to use the length of straight sections as if the beta ratio were 0.7.

4.How to install orifice plate in pipeline?
4.0. Location of the connections in the pipe or flanges
In order to measure the differential pressure, it is necessary to connect the transmitter to the process through the connections available in the pipeline.
These connection lines are called impulse lines or differential pressure sockets. The design of these elements must be in accordance with the type of primary element and with the type of connections used in the calculation.
In most cases, the orifice plate with flange sockets is used.
In the orifice flange sockets, 2 valves called “root valves” are placed, which allow the impulse lines and the transmitter to be isolated from the main process line.
4.1.Horizontal Installation Guidelines
A) Horizontal Installation for Clean Fluids
With an horizontal line, the pressure connections should be made at the SIDE of the line to allow trapped vapors to escape from the connection lines, and to prevent sediment from entering in these lines.
In this way, the pressure taps are always full of liquid and balanced, just as the instrument will only measure the differential pressure corresponding to the flow rate.
The following instructions apply for the layout of the orifice plate and transmitter when liquid flow is to be measured:
- The pressure tappings should be horizontal or up to 45° below the horizontal.

Position of Pressure Tappings for Liquid Measurement - They must never be taken off from directly below the orifice plate as any dirt from the pipeline may fall into the impulse piping and either block it or cause a serious error in the transmitter reading.
- The two impulse pipes should follow the same route, preferably clipped together.

Horizontal Installation for Clean Fluids - The transmitter should be installed at a lower position than the orifice plate.


The upper drawing shows two types of remote assemblies that allow the instrument to be placed in an accessible area free of vibrations.
The lines must always have an upward slope of more than 10%, to facilitate the venting of any gas that may be in the chambers of the transmitter or in the lines.
B) Horizontal Installation for dirty or corrosive Fluids using a seal
If liquid being measured must not come in contact with transmitter, 3/8 inch tubing and transmitter body must be filled with suitable seal liquid. The 2 filling tees must be at same elevation.

C) Horizontal Installation for clean non-condensable gas
The following instructions apply for the layout of the orifice plate and transmitter when gas flows are being measured.
The assembly of the transmitters above the process line and with slope in fall from the transmitter to the orifice plate, guarantees that no stopper will be formed in the lines since the slope will facilitate drainage, allowing moisture to drain out and not fill the impulse piping.
The position of the pressure tappings shall be vertical or within 45° of the vertical:
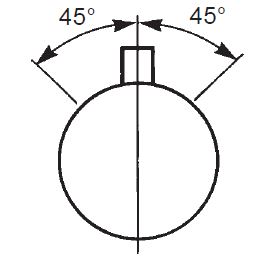
The Pressure Transmitter should be installed at a higher position than the orifice plate.
The two impulse pipes should follow the same route, preferably clipped together

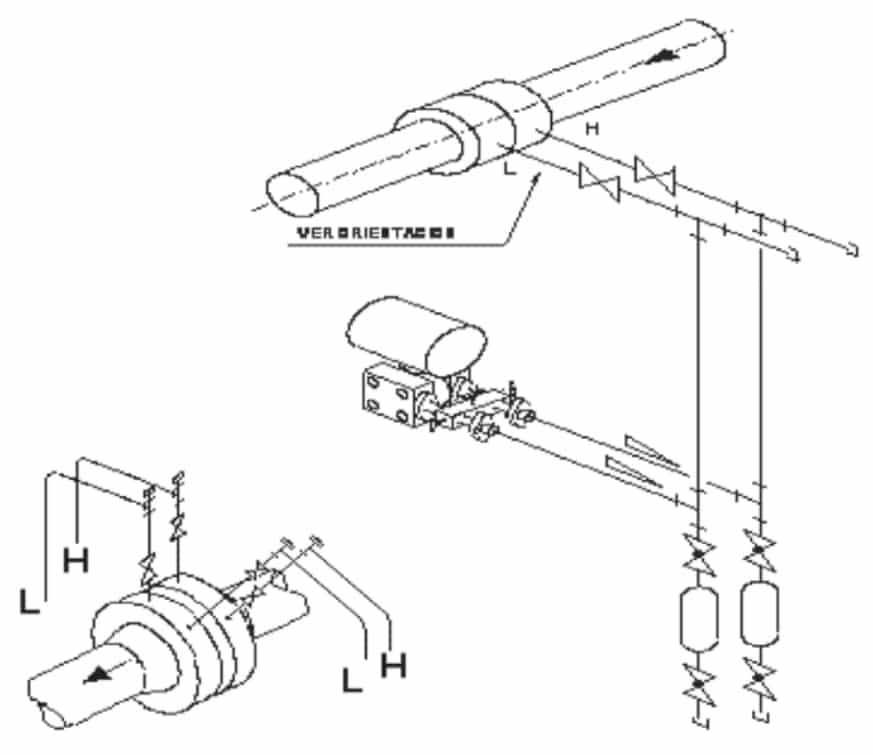
When for different reasons the instrument can not be mounted above the orifice plate, or when the gas may have condensable or liquid entrainments, an assembly will be made as the upper drawing.
The connections of the orifice plate will be conducted upwards, as shown in the diagram.
Condensate collection pots will be installed in both lines. The instrument will be placed higher than the connection to the vertical impulse lines, and connections between the process and the pots will have a small gradient to facilitate any liquid draining into the pots.
The valves on the pots will be open in normal service. Any liquid that enters or condenses in the impulse lines will drain into the pots.
This assembly will prevent the formation of liquid columns in the impulse lines and the instrument will measure correctly for long periods of time. The pots should be checked and drained periodically to prevent the accumulation of fluid.
D) Horizontal Installation for vapor or dirty or condensable gases
The following instructions apply for the layout of the orifice plate and transmitter when steam flow is being measured. The connections from the orifice plate can be made with connection in horizontal, vertical or 45 degrees upwards. In all cases, the two connections (high and low pressure), must be connected at the same level, so that the liquid columns in both chambers of the transmitter have the same height, and can be canceled with each other.
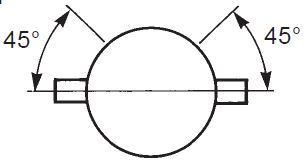
- The position of the pressure tappings shall be horizontal or up to 45° above the horizontal.
- The DP Transmitter should be installed at a lower position than the orifice plate.
- The impulse lines should be filled with condensed water to prevent damage to the transmitter.
- Temperature at the measuring cell should be less than 100°C.
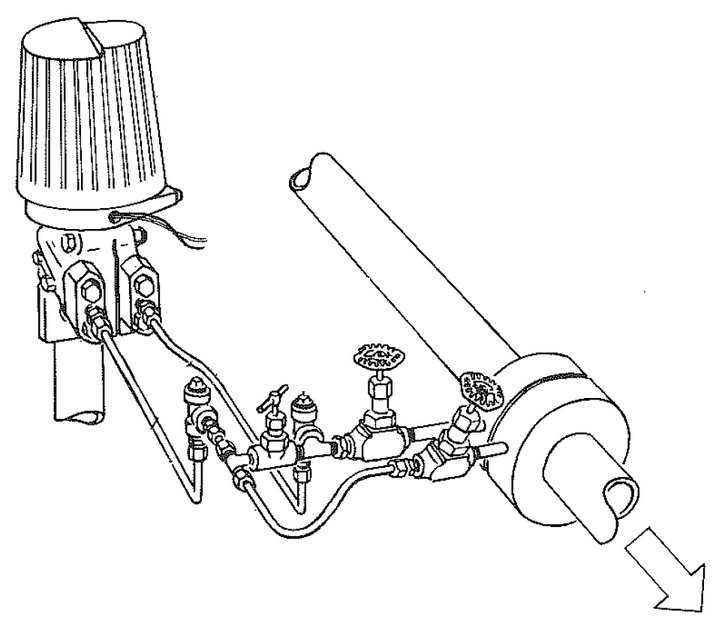
In the measurement of steam flow, the instrumentation must be installed below the differential pressure element and at a distance sufficient to allow condensation and cooling of the steam.
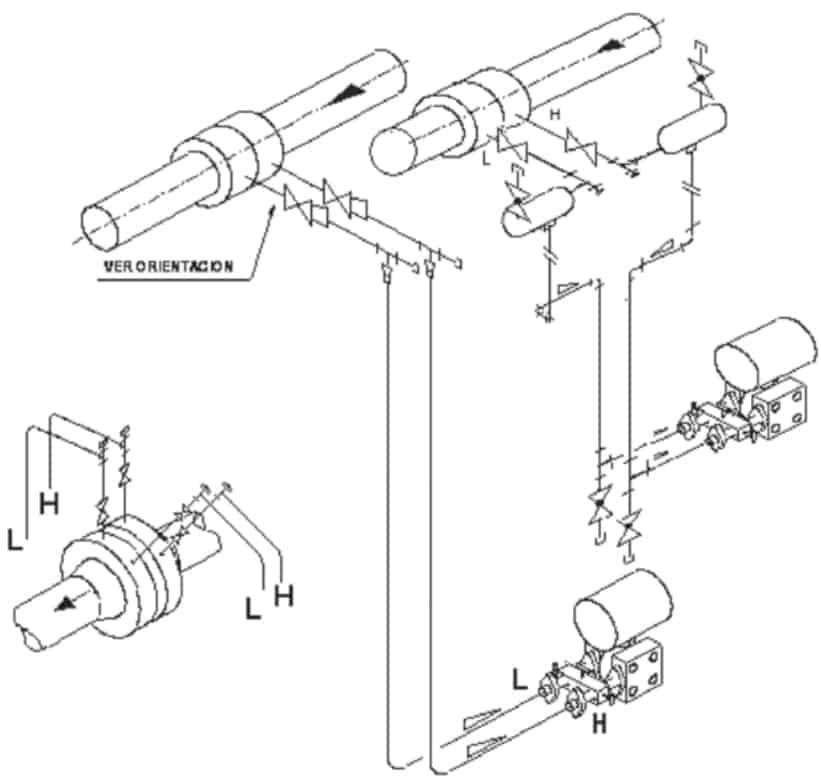
Due to the high temperature of the steam, which can cause damage to the equipment or to the electronics of the instrument, condensate columns/pots should be installed between the instrument and the steam that goes through the pipe.
Can we install orifice plate in vertical line? Yesss
If the orifice plate can not be installed in a horizontal process pipe, we must follow the following recommendations.
4.2.Vertical Installation Guidelines
Depending on the orifice plate installation direction the impulse piping should be set up as shown below :
In the case of having an ascending fluid, the impulse piping must be configured as shown below. The difference in the static head pressure can be compensated using the zero adjustment on the pressure transmitter.
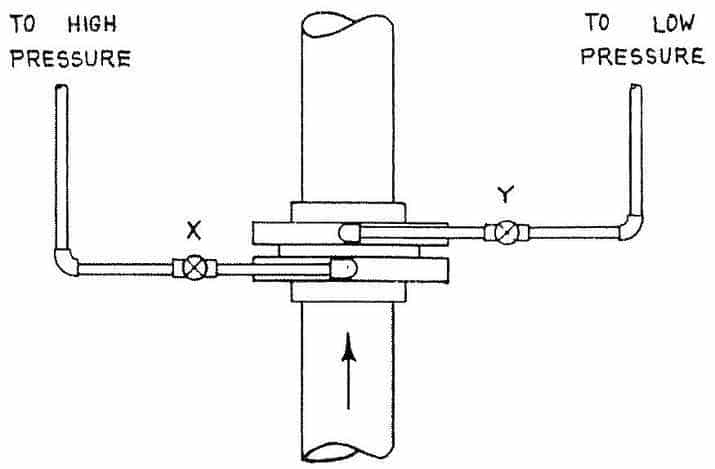
In the case of having a descending fluid, the impulse piping must be configured as shown below. The difference in the static head pressure can be compensated using the zero adjustment on the pressure transmitter.
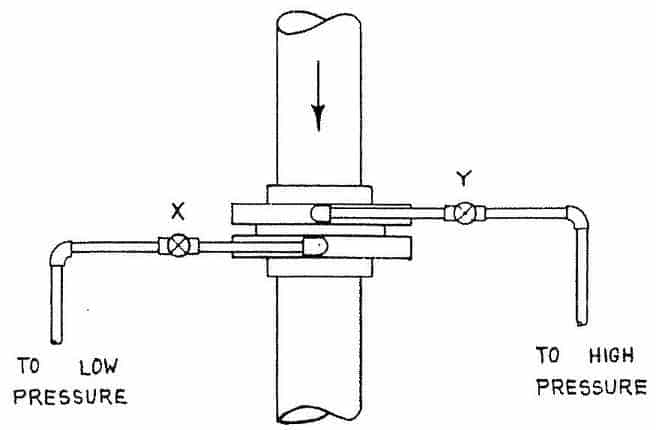
A) Vertical installation for clean liquids

B) Vertical installation for dirty or corrosive liquids
Mount the transmitter LOWER than the pressure connections.

C) Vertical installation for clean non-condesable gases
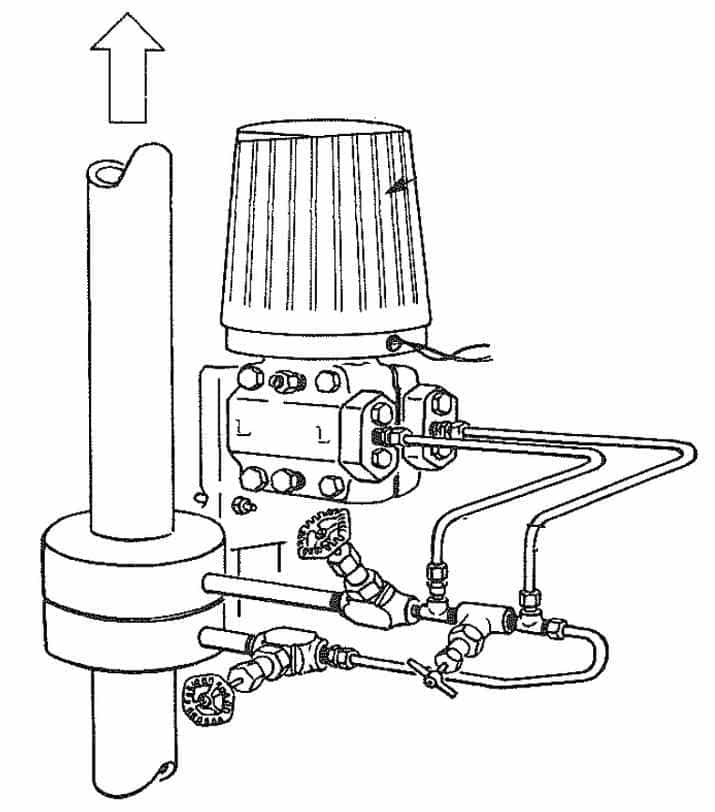
D) Vertical installation for vapor condensable gases or dirty gases

5. Length of connection lines to the process
In general, the circulating fluids through the process pipes should not be carried through the instrument connection lines to control rooms, interconnection rooms, local panels or any room that may be closed or partially closed.
As a general rule the instruments should be mounted as close as possible to the impulse intakes
and in areas with high ventilation.
The shorter the lengths of the lines, the less possibility of leakage, plugging and higher speed in the response
of the transmitter to variations in the differential pressure.The possibilities of error decrease with short lines.
On the other hand, long lines require greater support, take up more space, require more materials and have a higher risk of leakage. However, the good location and accessibility of the instruments in accessible ground or platforms is one of the fundamental factors for the execution of a good maintenance.The savings in stairs, scaffolding, hours of execution of the works and the increase of the safety, compensate in a short time the extra initial cost of this type of assembly.
6. References:
- Orifice Plate Installation Drawings from Foxboro Co.
- BRISTOL BABCOCK (1989) Flowmeter Applications
- SPIRAX SARCO (1997) M410 Orifice Plate Assemblies
- EMERSON (2014) Rosemount 1495 Orifice Plate, 1496 Orifice Flange Union.
- Rosemount-2011-Installation-and-Flowmeter-Orientation.pdf
- I.Fernández de la Calle (2013) Sistemas Instrumentados de Seguridad y Análisis SIL.
Another articles that may interest you:
- How to convert actual flow to normal flow?, How to convert standard cubic meter to normal cubic meter?, How actual to normal flow conversion works? If you want to answer these questions don't forget to read Difference between Actual, Standard and Normal Flows
- A complete list of the indispensable books that every professional in process control engineering must have, with prices and direct links to buy them if you want.
- In Hose Flow Rate Calculator you will be able to calculate the average flow of a hose based on the different variables.
- Orifice Plate Calculator-Find Orifice Size is an useful tool to calculate the size of an orifice plate.
- Orifice Plate Calculator-Find Pressure Drop is another of our free online calculators .
- Learn about the compensation flow calculation formula or equations in "Pressure and Temperature Flow Compensation Formula."
Any question?
If you have any question regarding this article, please don't hesitate to get in touch ... Anyway you can have a look at our frequently asked questions page, there you will find a solution to the most common questions.
